
Advertisers: landing page before e-com shop
The most common funnel or e-commerce is driving the traffic directly to the shop, either to the main page or to some product. But sometimes, you might need to use a landing page in between, an additional step to increase the conversion rate, for example. If this is your case, then this article will help you to set it up in a proper way so as not to lose the click information on the way.
Within this type of setup, there are 2 different scenarios possible:
1. Your landing page has the same domain as the e-com store
2. The domains are different.
Follow the steps below, depending on your case:
The same domain
For example, your landing page domain is landing.example.com, and your e-com store is placed on the same domain shop.example.com.
1. Take the universal tracking script you created for your e-commerce shop (with a cookie domain equal to your root domain: example.com in our example).
2. Place the universal tracking script on your landing page code.
3. Proceed with the shop integration if you haven’t set up one.
Different domains
Example: your landing page domain is landing.com, but your e-com shop’s domain is shop.com
1. Integrate RedTrack with the shop.
2. Create one more default campaign for this landing page.
3. Create a dedicated universal tracking script for this landing page where:
- Choose this option in the Script type field:

- The cookie domain will be landing.com (the root domain of your landing page);
- The Default Campaign will be the one created within step 2 above (i.e. Default Campaign for LP)
4. Place this universal script into your landing page code.
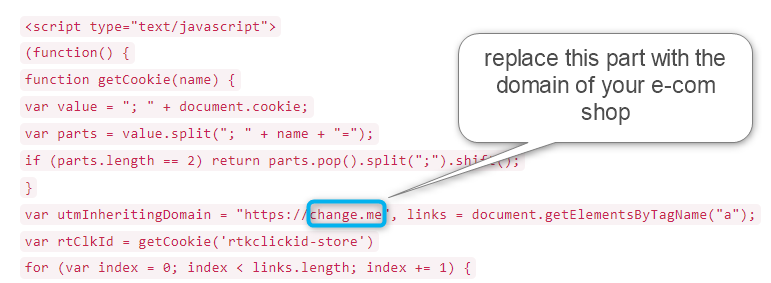
5. Set the condition for your landing page to lead to your e-commerce shop store. It is done via GTM with the help of the special script created for that purpose:
<script type="text/javascript">
 (function() {
    function getCookie(name) {
    var value = "; " + document.cookie;
    var parts = value.split("; " + name + "=");
    if (parts.length == 2) return parts.pop().split(";").shift();
    }
 var utmInheritingDomain = "https://outbounddomain.com", links = document.getElementsByTagName("a");
    var rtClkId = getCookie('rtkclickid-store')
 for (var index = 0; index < links.length; index += 1) {
   var tempLink = links[index].href,tempParts;
   if (tempLink.indexOf(utmInheritingDomain) > -1) {
     tempParts = tempLink.split("#");
     console.log(tempLink)
     if (tempParts[0].indexOf("?") < 0 ) { tempParts[0] += "?" + 'rtkcid=' + rtClkId  } else { tempParts[0] += "&" + 'rtkcid=' + rtClkId }
     tempLink = tempParts.join("#");
   }
   links[index].href = tempLink;
 }
}());
</script>
Example: mywebsite.shopify.shop